
APIのドキュメントはswaggerがメジャーかと思いますが、ドキュメントと実装とをダブルメンテしていくのってなかなか難しいですよね。。。
そんな課題を解決してくれるのがSpringDocで、Contollerのコードからswaggerの定義を自動生成してくれるんです!!
この記事ではそんなspringdocの使い方について解説していこうと思います。
▼似た機能をもつspringfoxについてはこちら(springfoxは最近メンテされてなさそうです。。。)
 【springfox】Controllerからswaggerを自動生成
サンプルコード
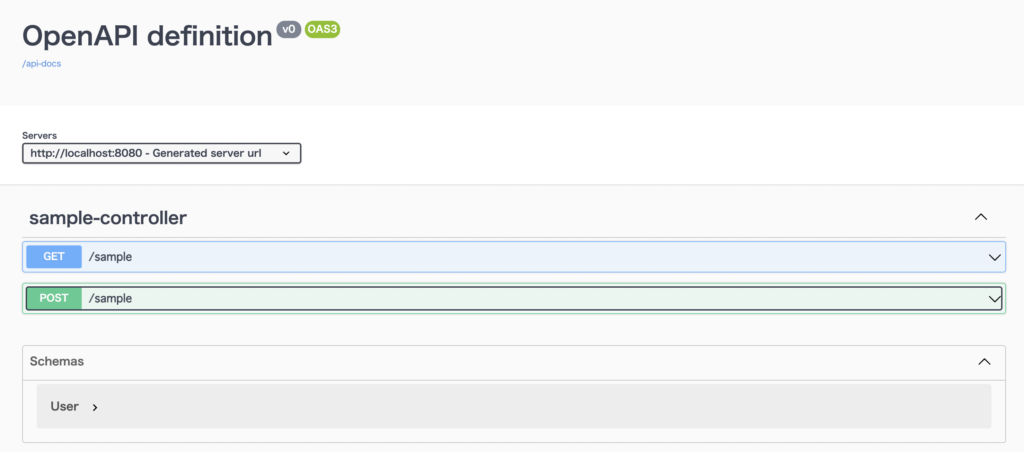
この記事では以下のControllerを対象に解説を進めていきます!
@RestController
@Validated
public class SampleController {
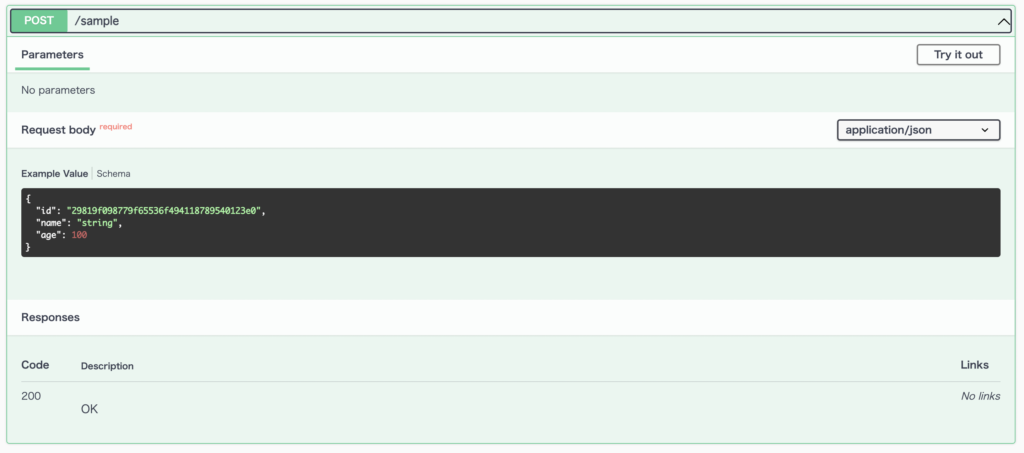
@PostMapping(value = "/sample",
consumes = MediaType.APPLICATION_JSON_VALUE,
produces = MediaType.APPLICATION_JSON_VALUE
)
public void register(@RequestBody @Valid User request) {
return;
}
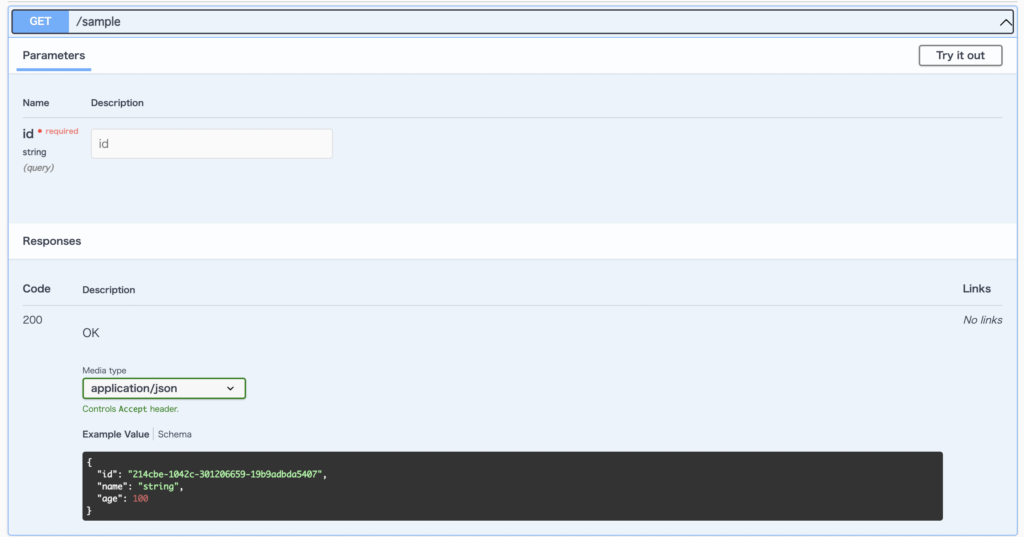
@GetMapping(value = "/sample", produces = MediaType.APPLICATION_JSON_VALUE)
public User get(@Pattern(regexp = "[0-9a-f-]{36}") String id) {
return new User("1234567890", "hogehoge", 30);
}
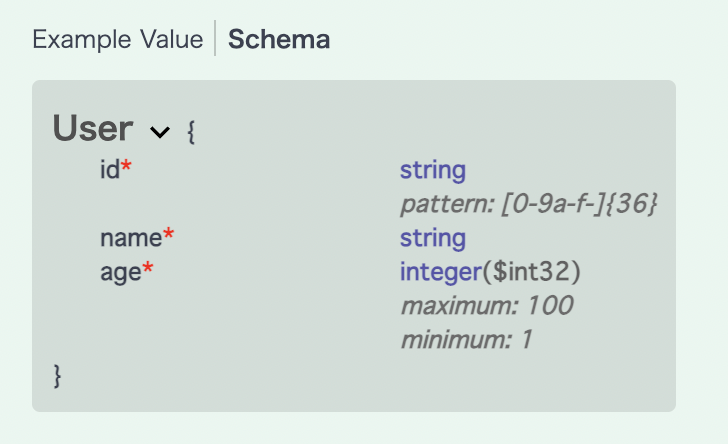
@Value
public static class User {
@NotNull
@Pattern(regexp = "[0-9a-f-]{36}")
private String id;
@NotNull
private String name;
@NotNull
@Min(1L)
@Max(100L)
private int age;
}
}導入
まずはspringdocの導入からです。
spring-web(WebMVC)の場合はspringdoc-openapi-starter-webmvc-uiを追加するだけです!
plugins {
	id 'java'
	id 'org.springframework.boot' version '3.0.2'
	id 'io.spring.dependency-management' version '1.1.0'
}

repositories {
	mavenCentral()
}

dependencies {
	implementation 'org.springframework.boot:spring-boot-starter-web'
	implementation 'org.springframework.boot:spring-boot-starter-validation'
	testImplementation 'org.springframework.boot:spring-boot-starter-test'

	compileOnly 'org.projectlombok:lombok'
	annotationProcessor 'org.projectlombok:lombok'

	// springdocの依存を追加する
	implementation 'org.springdoc:springdoc-openapi-starter-webmvc-ui:2.0.2'
}→ 2系はあと1年もしないうちにEOLになるため3系での紹介となります🙇♂️
・WebFluxの場合は
springdoc-openapi-starter-webflux-uiを使えば良いです!この状態でアプリケーションを起動し、http://localhost:8080/webjars/swagger-ui/index.html にアクセスするとSwagger UIが表示されます!
ライブラリ入れただけなのにいい感じ!!!
カスタマイズ
ここからはデフォルトの表示からの変更方法を逆引きで解説していきます!
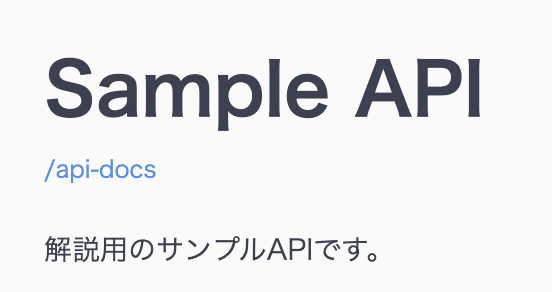
タイトル
デフォルトで「OpenAPI definition」と表示されている部分です。
@OpenAPIDefinitionでカスタマイズ可能です!
@Configuration
@OpenAPIDefinition(
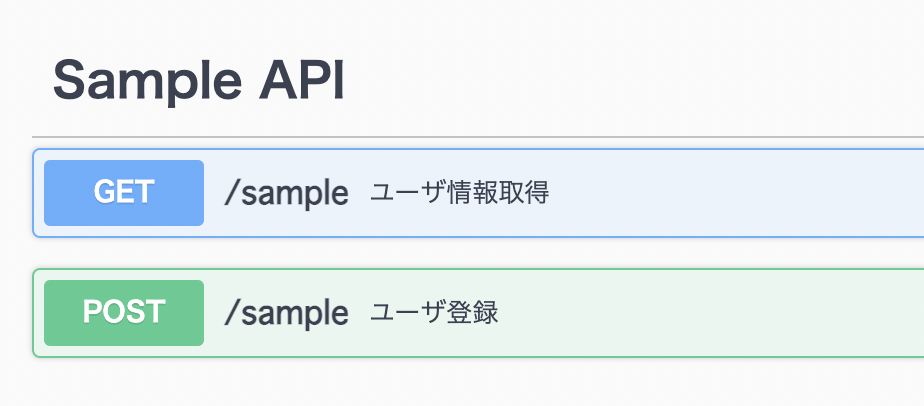
info = @Info(title = "Sample API", description = "解説用のサンプルAPIです。")
)
public class SwaggerAutoConfiguration {
// クラスの中身は空でもOK
}
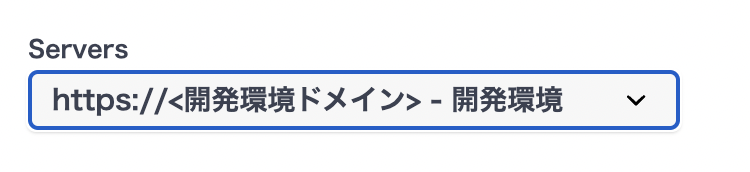
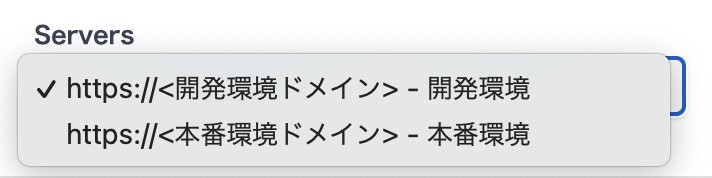
Servers
Serversはデフォルトでアクセス情報を利用して埋め込まれます。
今はlocalhostで起動しているので「http://localhost:8080」という具合です。
これをカスタマイズしたい場合は@OpenAPIDefinitionを使います。
@Configuration
@OpenAPIDefinition(
        servers = {
                @Server(url = "https://<開発環境ドメイン>", description = "開発環境"),
                @Server(url = "https://<本番環境ドメイン>", description = "本番環境")
        }
)
public class SwaggerAutoConfiguration {
    // クラスの中身は空でもOK
}
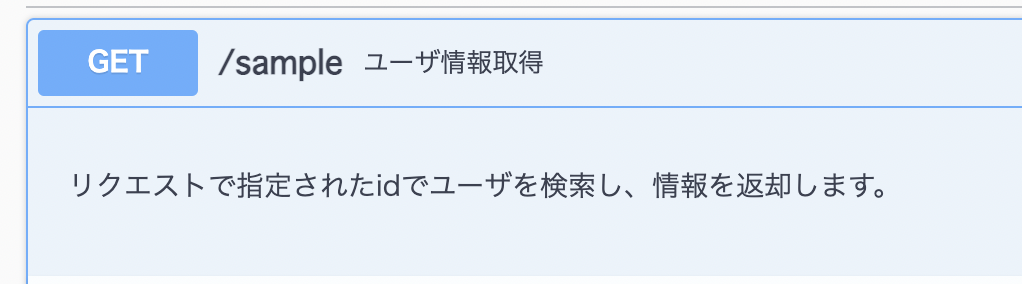
エンドポイントの説明
デフォルトでは/sampleというようにパスの情報のみが表示されていますが、@Operationを使用することで「summary」と「description」を追加できます。
    @PostMapping(value = "/sample",
            consumes = MediaType.APPLICATION_JSON_VALUE,
            produces = MediaType.APPLICATION_JSON_VALUE
    )
    @Operation(summary = "ユーザ登録", description = "リクエストで指定された情報でユーザを登録します。")
    public void register(@RequestBody @Valid User request) {
        return;
    }
タグ
swaggerでは、tagsでAPIをグルーピングすることができますが、
springdocではデフォルトでControllerごとにtagが自動で付与され、tagの名前はControllerクラス名をもとに設定されています。
これを変更したい場合は、@Tagを使用します。
@Tag(name = "Sample API")
public class SampleController {
    ...
}
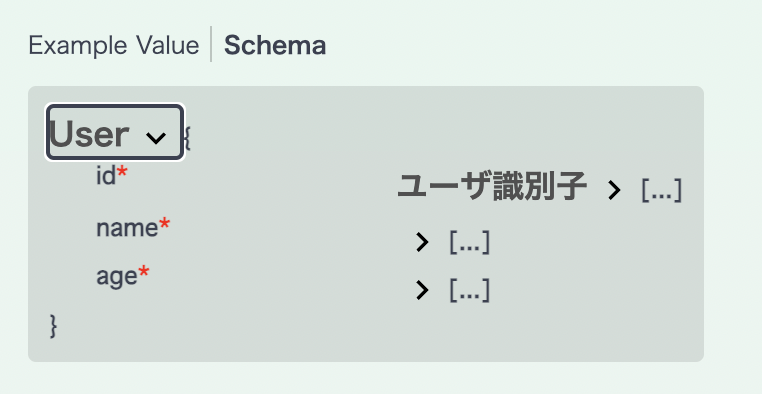
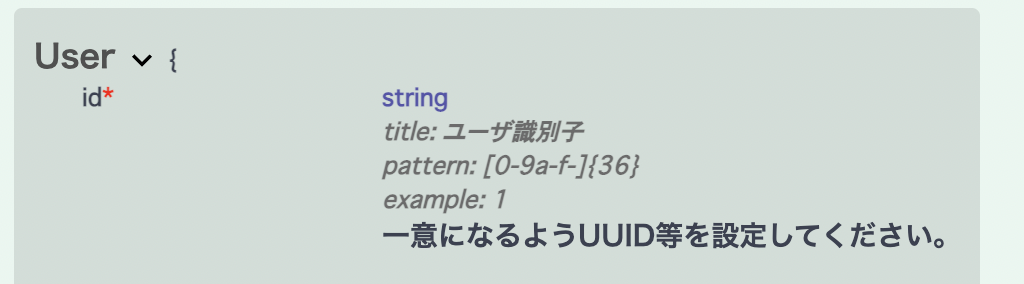
モデルに説明やサンプルの値を追加する
@Schemaを使用することでモデルクラスの各フィールドに情報を追加できます!
    @Value
    public static class User {
        @NotNull
        @Pattern(regexp = "[0-9a-f-]{36}")
        @Schema(title = "ユーザ識別子", description = "一意になるようUUID等を設定してください。", example = "1")
        private String id;

        ...
    }
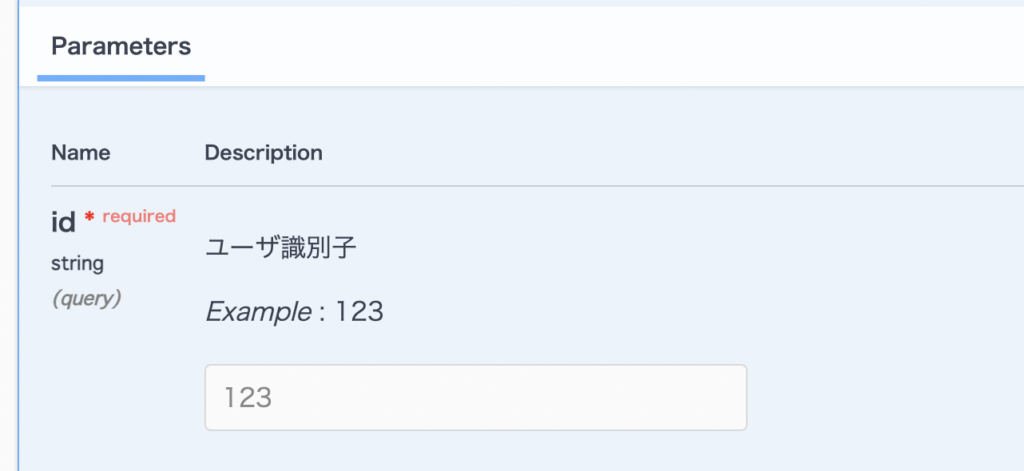
クエリパラメータに説明やサンプルの値を追加する
@Parameterを使用することで各パラメータに情報を追加できます!
    @GetMapping(value = "/sample", produces = MediaType.APPLICATION_JSON_VALUE)
    public User get(
            @Pattern(regexp = "[0-9a-f-]{36}") @Parameter(example = "123", description = "ユーザ識別子") String id
    ) {
        return new User("1234567890", "hogehoge", 30);
    }
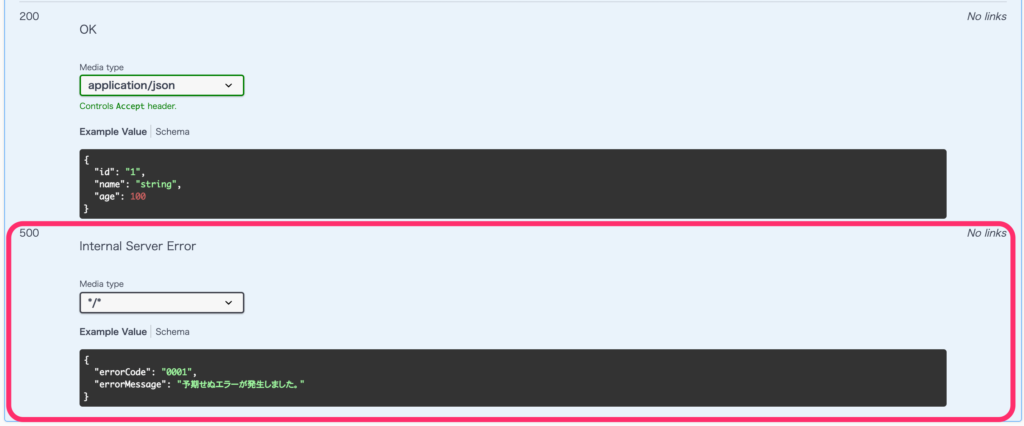
共通のエラーレスポンス
@ControllerAdviceクラスで例外処理をすれば自動で共通エラーも定義してくれます!
※カスタマイズとはちょっと違いますねw
1つだけ注意があってレスポンスステータスは@ResponseStatusで定義するするようにしましょう。
※@ResponseStatusがないとspringdocが反応してくれないようでした。
@ControllerAdvice
public class SampleControllerAdvice {
    @ExceptionHandler(Exception.class)
    @ResponseStatus(HttpStatus.INTERNAL_SERVER_ERROR)
    public CommonErrorResponse handleException() {
        return new CommonErrorResponse();
    }
}
@Data
public class CommonErrorResponse {
@Schema(title = "エラーコード", example = "0001")
private String errorCode;
@Schema(title = "エラーメッセージ", example = "予期せぬエラーが発生しました。")
private String errorMessage;
}
ControllerAdviceやResponseStatusが使えない場合
以下のようにGroupedOpenApiをBean登録することで同等のことが可能です!
@Configuration
public class SwaggerAutoConfiguration {
    @Bean
    public GroupedOpenApi publicApi() {
        return GroupedOpenApi.builder()
                .group("sample apis")
                .addOpenApiCustomizer(new CommonErrorResponseCustomizer())
                .build();
    }

    public static class CommonErrorResponseCustomizer implements OpenApiCustomizer {
        @Override
        public void customise(OpenAPI openApi) {
            openApi.getComponents().getSchemas().putAll(ModelConverters.getInstance().read(CommonErrorResponse.class));
            openApi.getPaths().values().forEach(pathItem -> pathItem.readOperations().forEach(operation -> {
                ApiResponses apiResponses = operation.getResponses();

                Schema schema = new Schema();
                schema.setName("CommonErrorResponse");
                schema.set$ref("#/components/schemas/CommonErrorResponse");

                MediaType mediaType = new MediaType();
                mediaType.schema(schema);
                ApiResponse apiResponse = new ApiResponse()
                        .content(new Content()
                                .addMediaType(org.springframework.http.MediaType.APPLICATION_JSON_VALUE, mediaType));
                apiResponses.addApiResponse("500", apiResponse);
            }));
        }
    }
}